by rush-intely | Dec 22, 2023 | WordPress
Post Views: 2 In the dynamic world of web design, capturing your audience’s attention is crucial. A visually stunning website can make a lasting impression, and when it comes to creating impressive sliders and presentations, Slider Revolution 6.6.20 stands out...

by rush-intely | Sep 7, 2023 | Web Development
Post Views: 0 WordPress is a popular platform for creating and managing websites. However, there may be instances where you need to convert your WordPress website into HTML. Converting your website into HTML can offer several advantages, such as improved website speed...

by rush-intely | Sep 7, 2023 | Web Development
Post Views: 0 Introduction Load testing is a crucial step in ensuring that your website can handle a high volume of traffic without any performance issues. It helps you identify potential bottlenecks, optimize your website’s speed, and enhance the overall user...

by rush-intely | Jun 20, 2023 | ChatGPT
Post Views: 4 Introduction In today’s digital world, artificial intelligence (AI) is no longer a futuristic concept but a present reality, with AI applications profoundly impacting diverse sectors. One such application, ChatGPT, developed by OpenAI, has been...
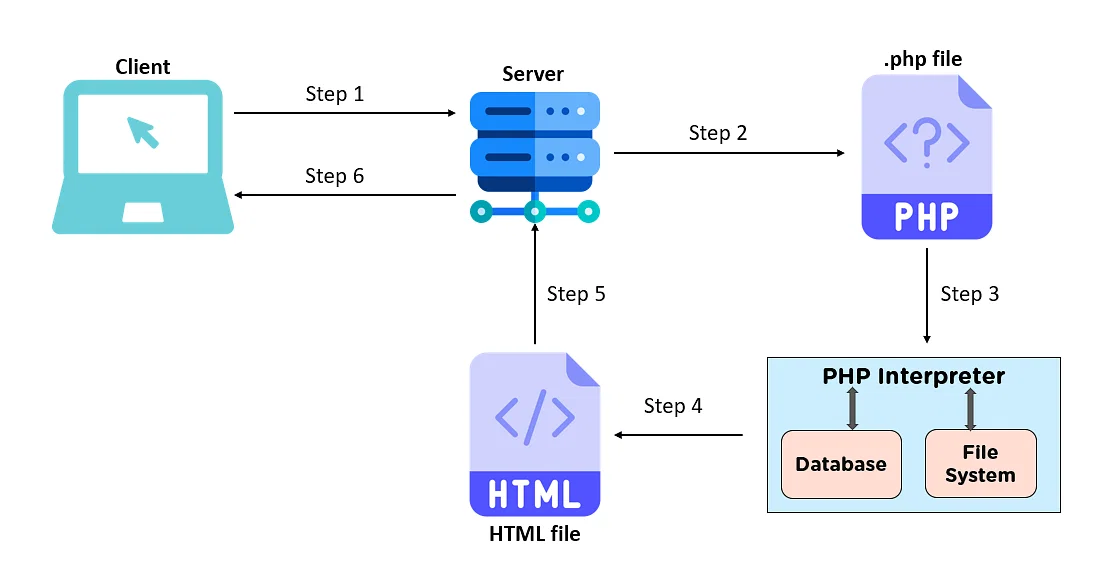
by rush-intely | Apr 19, 2023 | PHP
Post Views: 3 Introduction: Welcome to our blog on mastering PHP! If you’re new to web development or looking to expand your skills, PHP is an essential language to learn. PHP (Hypertext Preprocessor) is a widely-used server-side scripting language that powers...

by rush-intely | Apr 1, 2023 | React
Post Views: 4 React JS is a popular JavaScript library for building user interfaces. It was created by Facebook and is used by many websites and applications. In this blog post, we will learn what React JS is, how it works, and why you should use it. What is React JS?...